Thursday, August 6, 2009

Cloning a snapshot attached Virtual Machine

I am returning back after a long vacation. Thanks to my new family member.

If you want to clone a snapshot machine you have to be very careful because snapshots are lost on cloned machine. This was usual method which we were using for migrating from one location to other location in order to save WAN bandwidth.

The method which we adopted was to clone the VM's to a cheap filer (FAS2020) and ship the filer . This way WAN link will be saved. With VC2.5 U5 and all we can do live cloning of VM's For the VM's which has snapshot I usually copy it "as it is " to the filer and then do the same thing out of filer. Register the VMX and all set.

Copy using SCP was very painful so I found new way to do it TAR

Get inside the VMFS volume.

tar zcf - <vm_folder_name>/ | ssh root@<target ESX host name> "cd /vmfs/volumes/<target vol name>/; tar zpxvf -"

Wednesday, July 22, 2009

I became DAD again


On 18-7-2009 me and my wife blessed with the baby boy. Baby weight 3.34KG and every thing was normal by GOD grace. It happen just like that. For our first kid my wife spend around 14hrs for the labour but this time it was really different experiance.


Around 8:30 AM my wife asked me to take her to the hospital and 10:37AM baby boy arrived.


Almighty was very very kind for both us . HE did not want to trouble us


Thank You


Friday, July 17, 2009

vCenter 2.5u4 Performance Overview - Chart could not be loaded .Error :The URI is empty

When I was trying to install plugin using plugin manager I was getting “Invalid URI: The URI is empty ”

clip_image002

VMTM forum suggested

http://communities.vmware.com/thread/196315

dlane's post above put me on the right track to a fix in our environment, so thanks for that! Ultimately I had a service ticket go all the way to VMware Engineering to verify what was wrong and nail down the process to fix it, but this was the key. Our vCenter server had two NICs, one of which is on a private non-routed subnet. The URL to the statsReportExtension.xml file was pointing to the unroutable IP instead of the one it should be, so clients couldn't reach it. Manually pointing a web browser to the URL with the correct IP can confirm this.

So, fixing this is a two step process. First of all, find the offending XML file and correct the IPs in it (should be like 3 instances, one in each stanza).This will point clients to the right data once they get the correct XML file. You should be able to find it under Program Files\VMware\Infrastructure\VirtualCenter Server\tomcat\webapps\statsreport\extension or something similar. Confirm the correct values by manually pointing to the URL with correct IP from a client system.

Second, you need to correct the values in the vCenter DB that tell the clients how to reach the XML file in the first place. You need to stop the vCenter service and Web Infrstructure Access service first. I also advise a backup of the vCenter database. Use a SQL query editor to connect to the DB and look at the entries in the VPX_EXT_SERVER table. Find the entry with EXT_ID=com.vmware.vim.stats.report, and correct the IP address in the URL column - don't change anything else, just the IP in that one entry. Save the changes and restart the vCenter and Web services. This should now correctly point clients to the XML file. Confirm that Perf Overview still works OK on the server itself (open VI3 client to "localhost"), and if that's working, see if it fixes the plugin on the client side as well by opening a new VI3 client session to your server. You should see that the Performance Overview tab appears when you have a Host, VM, or Resource Pool selected. You should NOT need to go to Manage Plugins and download anything, it should just be there when you start the client and select the inventory item... Trying to download the "report" plugin is NOT going to work and will result in the "Invalid URI" error.

If you're still having problems, it's probably a different issue... try some of the other fixes/articles already linked here, or open a Support case with VMware. Good luck!

One More VMTM thread discussed different solution

http://communities.vmware.com/thread/196237

But I got it resolved this by restarting

clip_image004

Installing Performance Overview Plugin for VC2.5 U4

Trying to better understand your virtual machine's utilization?

Well look no further. Virtual Center 2.5 update 4 (released on Feb 23, 2009) has a great new plug-in that summaries all your virtual machines metrics,

from one convenient screen! If you have used the performance charts in Virtual Center, then you know how difficult they can be to work with. Analyzing a virtual machines performance can be a tedious task, especially when trying to understand capacity and doing trend analysis. Until now, the performance charts were the only tools available to monitor system performance. You would have to navigate through several different charts to understand a virtual machine CPU, memory, I/O and network utilization – quite a lot of work to say the least. New in Virtual Center update 4, is a less well known performance "overview" plug-in that makes virtual machine analysis a breeze. Unfortunately the plug-in doesn't come built-in to Virtual Center. Not to worry though, in the following pages, we will walk you through the steps necessary to install the new performance charts and have you analyzing your virtual machines performance in minutes!

Note: This plug-in is only offered in Virtual Center update 4 (build 147633 or greater). If you are not running VC update 4, you must first upgrade your Virtual Center instance. Please see VMware's release notes for details on upgrading.

We'll begin our installation with Java.  If you already have the Java SE development kit installed, you can begin with the section below entitled Configuring Java Environment Variables

Download Java

Download and install the Sun Java SE development kit on your Virtual Center Server. Unless you are an advanced user, select the defaults through the completion of the installer. Take note of the install location as we will need this path later when configuring Java's environment variables.

Configuring Java Environment Variables

We must now set the appropriate environment variables for Java to run correctly on our Virtual Center server.

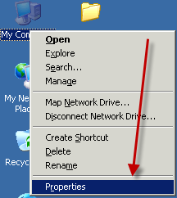
  1. Right-click ‘My Computer’ and click ‘Properties’                   

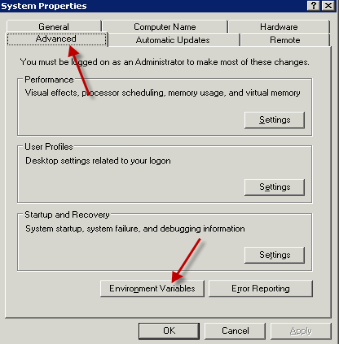
2. From the ‘Advanced’ tab, click ‘Environment Variables’

  1. Select the 'Path' system variable and click 'Edit.' Append the location Java was installed from the Download Java section above. If you used the defaults during the installation, this should be ';C:\Program Files\Java\jdk1.6.0_11\bin\'

Note: Ensure to include the ‘;’ – this acts as the delimiter between field elements In the System variable list, click ‘New’

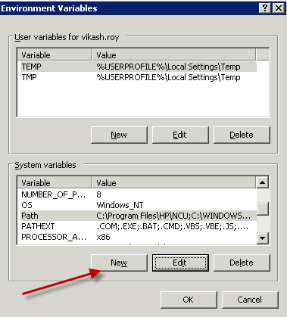
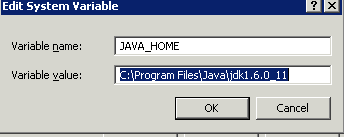
  1. In the 'Variable name', enter JAVA_HOME and in 'Variable value', enter 'C:\Program Files\Java\jdk1.6.0_11' or the path where Java was installed (from the Download Java section above)

Click through the remaining screens selecting the 'OK' option until the changes have been saved.

  1. Click through the remaining screens selecting the 'OK' option until the changes have been saved.

Install Virtual Center Performance Charts

Now that Java is configured, we are ready to install the performance chart plug-in.

  1. Open the command prompt on your Virtual Center server:

Start >> Run >> CMD

  1. Run install.bat from your VMware Virtual Center installation media:

      D:\vpx\perfCharts>install.bat

      **************** VMWare Stats Installer ******************************

      Usage: install vcUserName vcPassword

      vcUserName is the user name you use to log in to the virtual center

      vcPassword is the password you use to log into the virtual center

      *****************************************************************

      D:\vpx\perfCharts>install.bat administrator password

      1. Once the installer has completed, run the Virtual Infrastructure client from your desktop

      2. Click 'Manage Plugins...' from the Plugins menu

      3. On the 'Available' tab, click the 'Download and install...' button on the viClientsScripts plug-in

      4. Once the installation has completed, restart the Virtual Infrastructure client

      5. From the Plugins Manager, click the 'Installed' tab and click the 'Enabled' check box next to the viClientScripts plugin

      6. You can now access the plug-in from the 'Performance Overview' tab in the Virtual Infrastructure client

      7. If you install client from VC2.5 U 4 DVD then there is no need of following above steps

      Once plugin is installed then you can view under VC for host as well as VM

    Tuesday, July 14, 2009

    Web Access of VC4.0

    I discovered new feature of ESX 4.0 that you can manage VC4.0 from web. No it’s not that this feature was not available with ESX3.5 . It was there but there is something which I am excited about

    1. Brand new screen which gives you feel of VC.

    2. Addition of Remote Console which was used for earlier version of ESX2.X

    clip_image002

    So when you try to popup VM it will ask you to install plugin compatible to browser (IE/Firefox)

    3. Using this plugin you can manage VM more effectively then earlier version of ESX. If you recall this screen looks familiar to VMware Player. So did they included that ?

    clip_image004

    4. This is how the web managed VC looks like

    clip_image006

    If you closely watch, you can even see  “Datacenter” where as this  is not available with 2.5U5 . VC 2.5 U5 shows you only folder and VM level hierarchy. Bottom part of web VC also gave you same feel of  VC client.

    That is all I have discovered so far.