Creating public SSL certificate is 3 step process.
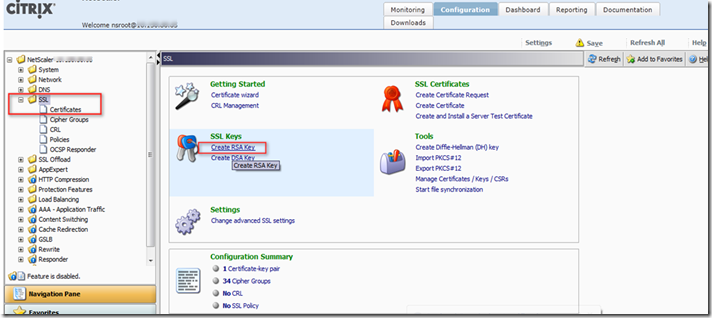
Step 1. Create RSA key: a) Login to NetScaler webpage using 'nsroot' and navigate to SSL section. Highlight 'certificate' and select 'Create RSA key' under SSL keys.
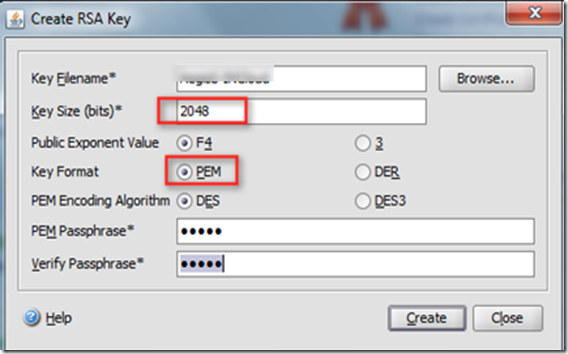
b) This will pop up a window asking for various information :
Key Filename: Can be anything and if you doing for first time no need to select browse .
Key Size : Can be anything in multiple of 1024 but most of the public site accept key size beyond 2048
Public Exponent value: Leave it to default F4
Key Format : Should be PEM unless you want DER format
PEM Encoding Algorithm : DES.
PEM/Verify Passphrase : Can be anything which should be remembered for future use.
Step 2. Create SSL Certificate request : a) Under SSL certificate page ,select 'Create Certificate Request' and this will popup other page

b) This will pop up a window asking for various information :
Request File Name : Can be anything and don't select 'Browse ' or 'View'
Key File Name: Will be from Step 1 (b) .
Key Format : Should be same as step 1 (b)
PEM Passphrase : Should be same as step 1 (b)
Supply rest of the info under "Distinguished Name fields" as required.
Noting is required for "Attribute Fields "

c) Click Create to create the certificate request file.
d) Click Close to close the Create Certificate Request window.
e) Use a program such as WinSCP (http://winscp.net) to copy the CSR to the Local
computer. The CSR file is located in the /nsconfig/ssl directory. This file need to send to
certificate authority like Verizon /Entrust/or Star .
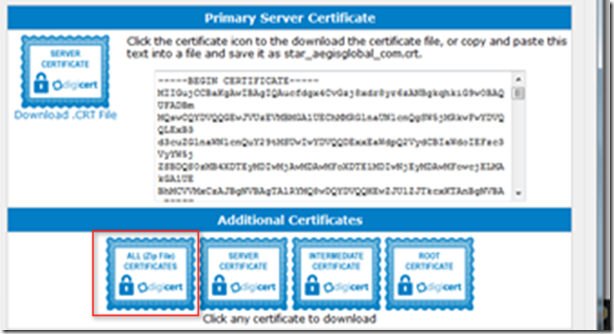
File received from one of the certificate authority as shown below . Select download all the certificate.
Step 3. Navigate through certificate tab and select add . This will pop up the box asking for information like
Certificate-Key Pair name: Provide friendly name
Certificate File name : Which you have received from CA provider . This can be PEM format . You can browse and select upload from local
Private Key File name : This would be from appliance as you have created in Step 1(b) .
Password : Same as step 1 (b) /2(b)
Certificate Format : PEM
You can choose to notify when this certificate is expired .

That's all you have to for creating and installing SSL public certificate. In next blog I will discuss about linking with Virtual servers.
SOURCE 1 and 2


