Tuesday, April 3, 2012

Dell OpenManage Server Administrator (OMSA) installation on XenServer 6.0.2

In order to install OMSA 6.5 on XS 6.0.2 , we need to get latest ISO from Dell site. Connect this ISO to the Dell Server via virtual CD ROM

image

Mount the CD-ROM on XenServer and run the install.sh script to start OMSA agent on XS.

image

This will install the require package

image

Insure the ports are open. By default installation does open the require ports

image

Start the server service

image

And point the URL to https://<HostIP>: 1311

image

Saturday, March 31, 2012

Configure HP Blade ,C7000 and HP Virtual Connect Manager (VCM) for XenServer infrastructure.

HP C7000 chassis can hold different blade model and for that refer to HP site . Here I am going to explain how HP Blade Center can be designed for XenServer . XenServer require 1 management NIC . This NIC can not be tagged at XenCenter level . Hence at the switch side this needs to be defined as trunk with access for management VLAN (Incase there is a dedicated VLAN ). Its a good practice to dedicate a VLAN for XenServer host.

Now out of 8 nic (by default Blade BL 460 G6 sever can give 8 NIC with nic partitioning . These 8 nic can be divided to be used as FcOE or ethernet . In below example I am using two NIC for management interface , two NIC for VM traffic and other two for FcOE. Here you can see there is last leg where FcOE is installed.

image

To start we need to ensure all the MAC as well as WWN is set to .

image

This is for Fibre network or FcOE.

image

Other setting is on advanced settings : Here we should use "Map VLAN Tags". Also we set the speed at server profile rather than global level.

image

Next is to create a uplink for ether network . This is called shared uplink set. There will be two shared uplink set as there are two switch . Each shared uplink set can have ports from respective switch and can not span across other switch. In other word we can have ports from single VCM. This will create one bundle provided on core switch there is a ether channel or LACP is done on the core switch. image

After all the ports are mapped this will be look like this . Here four 1 Gb ports has been mapped to one share uplink . Hence uplink bandwidth from one VCM is 4Gb. 

image

For creating VLAN's we need to create on each of the SUS (Shared uplink Set) . Right click as shown below and select add. This will prompt for network details We need to be careful with tagging VLAN. Again set the network speed at NIC level.

image

Now define shared uplink for SAN. Assigned the port based connectivity.

image

Once SUS is defined for SAN this is how it looks like . Here each 2Gb port will be bundled to create 4Gb uplink to storage.

image

Now once these two SUS is created each for Ethernet as well SAN this should be mapped to the profile. "Multiple Networks " will allow you to create multiple VLAN on single bond or link . These VLAN can be selected as shown below after creating on each of the SUS. You can also see LOM in each BAY1 and BAY 2. Hence each blade will have 4 NIC on BAY 1 and 4 NIC on BAY2.

image

This is how the Ethernet Networks looks like when it is mapped . Here you can see each network is mapped to each of the server profile.image

On XenServer , this is how looks like. Here you can see management NIC is set to 1GB where as other NIC is set to 2GB. 

image

We have created a Bond 2+3 for VM network and this is how VLAN is mapped .

image

That is all for now, hope you enjoyed

Wednesday, March 28, 2012

How to Change XenServer (6.0.2) pool IP address.

Prior to XenServer 6.0 if you have to change the pool IP address there were few steps need to be followed from CLI but with 6.0 and above it has been made simpler . How check this out:

1. I got two XS pool where I need to move both host from IP address to other IP address. Get the console access and then select the following from xsconsole

image

This will bring warning window

image

Select the interface and hit OK

image

Choose the static mode to re-ip the host

image

For the slave you will get following option

image

Finally it will prompt you reboot , make sure you reboot the pool master first and then all the slave. This needs to be done simultaneously .

image

Friday, March 23, 2012

Verint Screen recording integration with XenApp

In this blog I will explain the way to integrate Verint Screen recording solution with XenApp. Solution from Verint is used widely by call center where agent desktop and voice is recorded simultaneously . While these solution is meant for physical desktop but Verint does support this on XenApp. Citrix does have its own screen recording solution but it does not record the voice like Verint does. Not have a good knowledge but looks like it has integration with extension as well as desktop that way anyone can make out what agent is doing while talking over the phone.

Solution from Verint is called as  "Impact 360 Version 10 QM & Analytics " . As per support following XenApp version is supported :

image

First agent is install the agent on XenApp box and before the that there is pre-requisite is following

image

Now run the U100_8447.msi to install the agent

image

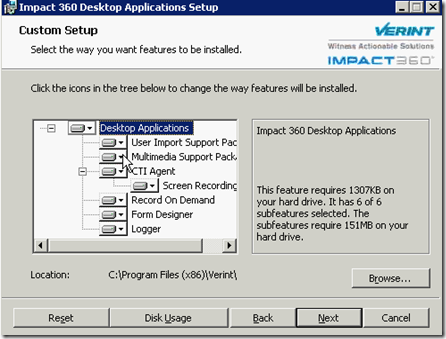
Choose the require module to install

image

From XenApp prospective "Thin Client Environment " should be checked

image

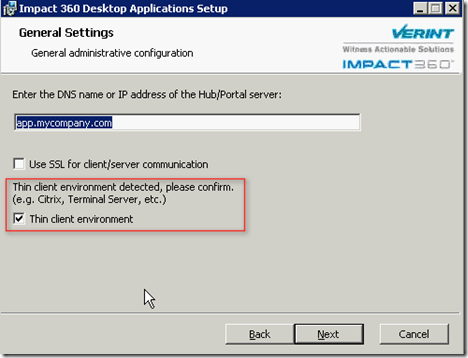
Provide the require setting, from XA prospective does not make difference .

image

Provide the require setting for ILA.

image

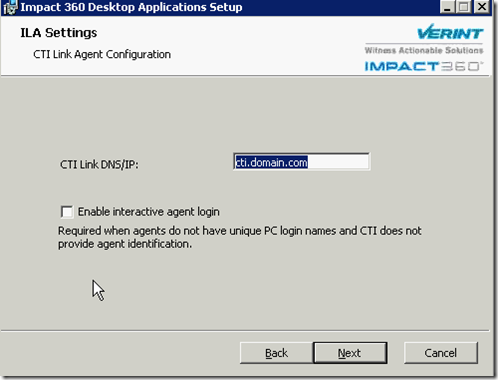
Go with default unless required changes.

image

This will start the installation of Verint impact agent .

image

Once the agent installation is completed make sure XenApp box is rebooted

image

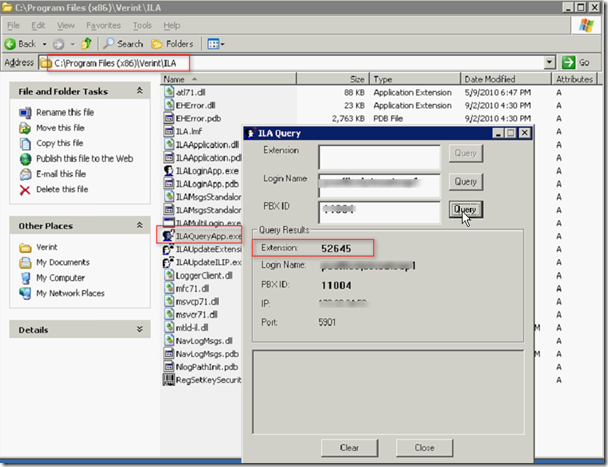
Now after the installation is completed make sure few testing is performed. Login with the XenApp box and execute ILAQueryApp.exe. Type the any user agent login ID with domainname\username along with PBX ID. This query should throw result

image

Run the IntelliLink Analyzer and make sure it should show success for the same extension. It will also show Screen IP.

image

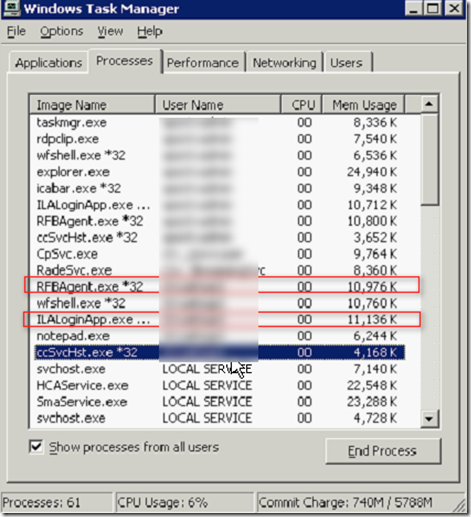
At the same time if task manager is launched on XenApp box , RFBAgent.exe/ILALoginApp.exe should be running under every user ID. This will ensure that recording will happen.

image

If the XenApp is published as Hosted Shared Desktop then nothing is required because each login will execute above two executable for each user. Now if recording as to be done for published application , it can be done in two way :

Option  1 – Automatic in Seamless Mode

If we have to execute this two executable for each application launch , following needs to be done

1   From the Impact 360 Version 10 Installation CD, from the Tools\Citrix folder, open the Citrix.zip and copy IlaApp.cmd to  the %WINDIR%\system32 folder.
2 Via Notepad, open UltraApp.cmd and verify that the directory path points to the ILA installation path. If not, modify the path accordingly.
3 Configure Anti-Virus not to remove IlaApp.cmd.
4 Run IlaApp.cmd and verify that the ILALoginApp, RFBAgent.exe and HostedApp processes appear in the Windows Task Manager; then end the processes.
5 From the Impact 360 Version 10 Installation CD, from the Tools\Citrix folder, open the Citrix.zip and run InstallILAforsharedapp.vbs to update the following registry keys:
HKLM\SOFTWARE\Microsoft\WindowsNT\CurrentVersion\Winlogon\AppSetup
HKLM\SYSTEM\CurrentControlSet\Control\Citrix\wfshell\TWI\LogoffCheckSysModules
These updates add RFBAgent.exe and Ilaloginapp.exe to the list of executables that seamlessly start upon a user's login and terminate upon logoff, thus ensuring the proper functioning of the CTI Agent.
6 Export the following registry key: HKLM\SOFTWARE\Microsoft\Windows\CurrentVersion\Run\ILA (for rollback purposes).
7 Delete the following registry key: HKLM\SOFTWARE\Microsoft\Windows\CurrentVersion\Run\ILA.
8 Verify the updates as follows:
a. On a Citrix client with no open session, run one of the published applications.
b. On the Citrix server, check the session information and verify that the RFBAgent.exe and ILALoginApp, processes appear in the Windows Task Manager.
c. From the same Citrix client session, run a second published application.
d. On the Citrix server, look at the session information and verify that the RFBAgent.exe, and ILALoginApp processes do not appear twice in the Windows Task Manager.
e. On the client side, close the second application.
f. On the Citrix server, verify that the session does not end on the Citrix server side and that ILA and RFB continue running.
g. On the client side, close the first application and verify that the session ends on the Citrix side and ILA and RFB stop running.

Apart of from above step even putting a login script for each user to run RFBAgent.exe, and ILALoginApp.exe. Also all the three executable Apps + (RFBAgent.exe, and ILALoginApp ) in a batch file and publishing the batch file will allow the seamless automatic launch of the agent + application

Option 2- Manually trigger the applications after login into thin client.

When the shared session mode cannot be used for all applications that need to be recorded (for example, a Citrix Farm where each server runs specific applications), you can provide a folder with application shortcuts. The user will then be able to activate Impact 360 V10 QM & Analytics applications by using the shortcuts residing in that folder. Note that this method enforces the manual activation of applications that are normally activated automatically upon login.

In below example before launching notepad , Verint ILA/Verint SAA should be executed

image

That's it for today and reference are :

A)  Impact 360 V10 Desktop Installations User Guide Ver M

B)  Impact 360 V10 Desktop Installations User Guide Ver V

C)  Impact 360 V10 Desktop Installations User Guide Ver K

Thursday, March 22, 2012

How to test ISCSI speed and capture trace for ISCSI nic on XenServer

In this blog I am going to talk about test throughput of ISCSI lun and then capture the packet on storage interface. Later on these packets can be open via wireshark.

image

In the above example first do find out lun which is currently mapped by running ll /dev/mapper. In my case it is the first one .

Now use the command to read the file size of 10MB *100 time which is like 1GB of date read from the lun . At the same time run tcpdump command on the same XenServer (Basically two ssh session ) on nic which is connected to the storage sub system . In my case it is xenbr8 . This can also be determined by running "route " command.

Do the same to determine  write speed . There would be two .pcap file under root which you can import using winscp and latter can be open via wireshark . When it open via wireshark it shows complete path for packet transfer

image