Saturday, June 8, 2013

Learning Hyper-V Lesson 8

Previous lesson 7 we discussed about setting SQL mirroring but then I was not aware what I need to do to start with SQL mirroring.  I decided to blog SQL 2008R2 install steps. Remember I am doing this production for the first time in life :) So pop-in SQL 2008R2 CD/ISO and run the installer.

This will check all the prerequisite 

image

Next it will ask what feature we are trying to install. We are installing just SQL server .

image

We need to insure that we have choose "Integration Service" here

image  

This will check for all the dependencies for feature selected.

image

Go with default instance.

image

Now disk space will be calculated for above feature installation.

image

Configure all the service to run with service account.

image

Choose the correct authentication method which you want. Recommended is to use mixed mode.

image

If you wana to place data and log files on separate drives. Everytime when you create new database this will place MDF file and LDF file on respective drive.

image

One more check before installation begun.

image

Finally nice summary for what install is going to be done.

image

If install is successful it will present message with green.

image

Learning Hyper-V Lesson 7

I am continuing this post from from Lesson 6.  Here we will discuss of setting up DB mirroring. So as per my understanding there are two way HA can be provided to DB 1) Clustering 2)Mirroring. In some situation both can be used as explained here and here .  Discussing SQL server HA is out of scope of this post.

Here we are using three server for mirroring 1) Principal running SQL enterprise edition 2) Mirror server running SQL 2008R2 enterprise edition and 3) Witness server running SQL 2008R2 standard edition. Witness can be any edition of server but Principal/Mirror need to be same edition. It is also recommended to use three different server for this purpose. Installation of SQL will be discussed in some other lesson. 

From Lesson 6 we have allowed SCVMM to create DB. Now we start with mirroring we need to backup the database. Before we backup the database make sure DB is in "Full Recovery " mode. By default SCVMM do not create DB in full recovery mode.

image

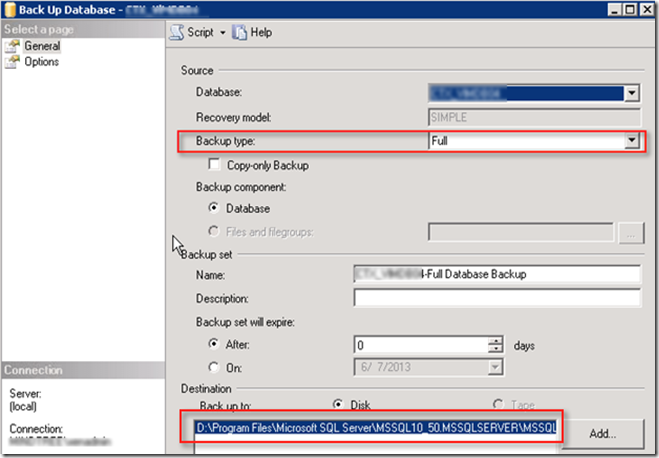
Now start the backup of SQL server database

image

And then perform choose backup type as full. Make sure you note down where the .BAK file is going to be placed. Because this need to copied to mirror server

image

Once the database backup is done , copy .bak file to the mirror server and then on Mirror server choose restore.

image 

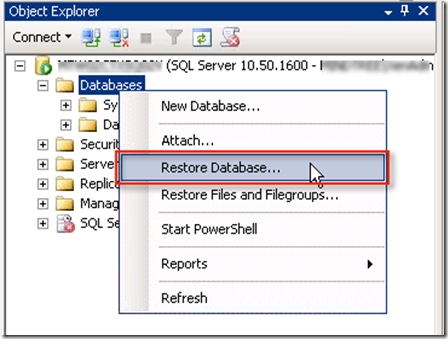
Choose from device and provide the path to the copied .bak file. Make sure under "To Database" you should type exact name as that on "Principal"

image

Now very important select option and choose "Leave the database non-operational" . This will insure that DB does auto fail over. Also you can see it shows both the ldf and mdf file at respective location which is how we have setup SQL (Both Data and log on separate drive).

image

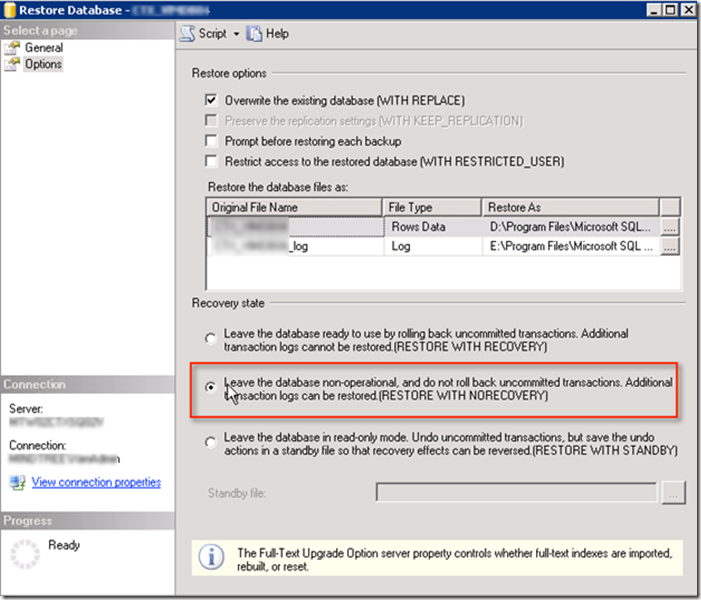
Once finish database status will appear with same name but status will be as "Restoring" . And FYKI this will not change because this is mirroring database is supposed to be setup (Sorry about my limited SQL knowledge).

image 

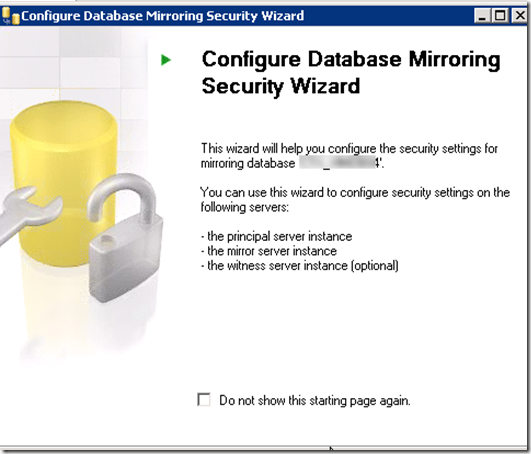
Now we have to start with mirroring on "Principal database"

image

And then choose configure security

image

This will run through Mirroring wizard

image

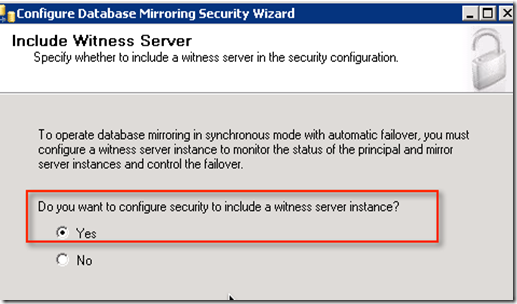
Here make sure witness server is selected to include this

image

By default Principal and Mirror will be selected.

image

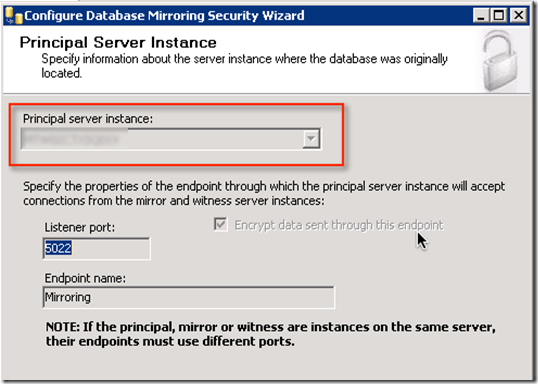
Now Principal server will be selected and port by default will be 5022. IF all the three instance (Mirror/Principal/Witness) are on same server then we need to choose different port. End point name should not be changed because mirroring works using this endpoint.

image

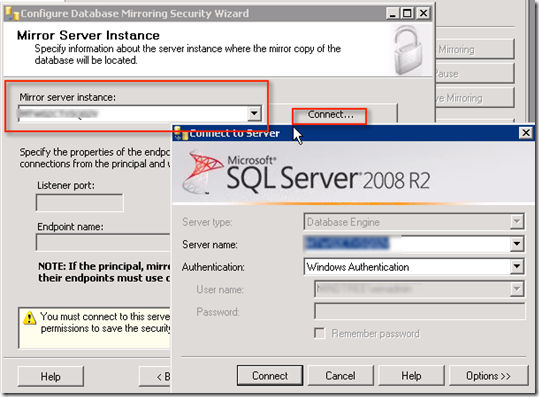
Here it will ask for Mirror instance. Type the mirror SQL server name and then connect. Type port number and endpoint name should be same as principal.

image

Next screen will ask for Witness server type SQL server name connect it via SQL authentication. Maintain same port number and endpoint name

image

Type service account for all the 3 SQL instances

image

This provide nice summary

image

Here it will configure the end points

image

And then it will ask to start mirroring

image

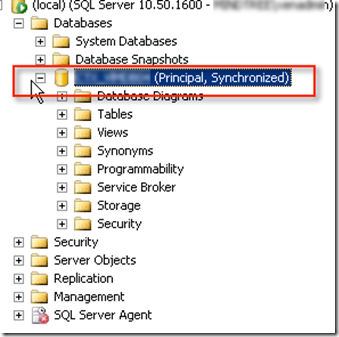
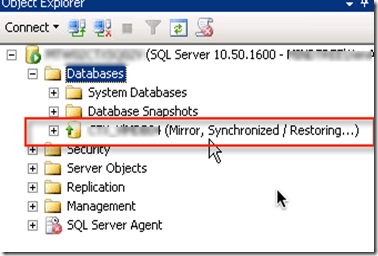
If everything is OK then mirroring will be established for High Safety with Automatic Failover. Status on principal will show as "Principal,Synchronized" where as on Mirror it will show as "Mirror,Synchronized/Restoring"

 image      image

Next Blog I will discuss about SQL installation   

Learning Hyper-V Lesson 6

Installing System Center Virtual Machine Manager (SCVMM) has been a challenge for me as you know I have background of VMWare and Citrix. So as a Citrix person if you have to install SCVMM and make its database highly available, it may poses challenge. This post will help you to deal with those challenge. Here I am trying to install SCVMM 2012 and mirrored it database on SQL server 2008R2.

Here I am using single service account for both SCVMM and SQL.

To install SCVMM we must know some of the prerequisite or else like me you may have to do during the course of install. Here I am installing as it is asked for :)

To start the installation pop-in System center CD and start installation. It will prompt for pre-requisite to be installed which is .NET. This is something I like when it does install of prerequisite without asking you to do so. 

image

At this point it will make you wait for little longer time. Now sure what is trying to do with License.rtf file.

image

Choose component which is required

image

Supply all require info like product key

image

Choose location

image

Now here is one more pre-requisite which it will check and will not allow you to pass till you install this. But this time it will not install it for you. You need to install AKI by downloading (incase you don't have ISO) it.

image

Next warning is amount of memory SCVMM server require. But this is just warning and it will allow to move on with installation

image

Next it will ask for DB option. When using DB mirroring make sure you use C-NAME /Alias (Create one ). Now this will provide HA when DB fail. Changing C-NAME will ensure that you do not need to make changes at application level. I have tried pointing to existing DB but installation failed. So option I choose is to allow SCVMM to create DB. But this may not liked by many SQL-DBA so I strongly recommend MS to look at this option and allow installer to generate script (Like we have with XD 5.x installation ). So if you want to use pre- created DB then make sure it has following option set  "SQL_Latin1_General_CP1_CI_AS"  for collation.image

Now this is very important step where you need to provide service account. Please note that this service account cannot be used to add Hyper-V host into SCVMM. Hence this need to be dedicate for service account. Secondly choose the link "What type of account should I use?" .  Choose option Distributed Key Management if required or it is not necessary. Looks like something equivalent to link mode which is available with Virtual Center?

image

Following ports will be required by SCVMM.

image

The Virtual Machine Manager library is a catalog that gives access to file-based resources stored on your library servers (such as Sysprep scripts, ISO images, and virtual hard disks) and to virtual machine templates, guest operating system profiles, and hardware profiles—database objects that you configure in Virtual Machine Manager. You can also store virtual machines in the library when they are not in use. This can be reconfigured at latter stage as well.

image

This will start installation of SCVMM

image

Once installed it will be give installation summery with error/warning if any.

image

Since this has became long post we will continue mirroring with Lesson7.

Learning Hyper-V Lesson 5

When we have VMWare Virtual Center updated with latest version and ESX host with some lower version we use to install VC agent on ESX host to manage via VC. In similar way there is something called Virtual Machine manager agent which need to be installed on Hyper -V host. To get that we need SCVMM ISO

image

Incase we require perimeter network then we need to define it here.

image

Following ports 5985 and 443 is used to communicate between VMM and Hyper-V host.

image

After agent is installed service is started on the host

image

That's all to install.

image

Learning Hyper-V Lesson 4

Continuing my series with regard to Hyper-V learning . We got to change IP for Hyper-V host as well Hyper-V fail over cluster. Well there are no GUI way to change IP address and it need to be changed via PS CLI. There are many blogs which provide insight into changing IP for in same VLAN but when VLAN changes it result in subnet change as well.

image

And then change IP address via following command

image