Friday, December 9, 2011

How to install Lotus SameTime 8.5.1 on Citrix PVS Streamed pooled desktop (VDI)

IBM Lotus Sametime is the enterprise communicator similar to OCS. It has similar feature as Microsoft OCA along with , it has ability to take screenshot and share over chat . Some of the cool feature liked by end users to  have his/her  own emotions on chat.

While installation is easy but it does not launch in PVS streamed VM's . PVS streamed VM  uses roaming profile because of pooled environment . This can only be achieved via storing user's profile data on shared storage.

IBM Sametime does not like it because it has tendency to store it locally . Below screenshot shows that  value called rcp.data store it locally. This setting does not allow the sametime to launch when desktop is access via ICA session.image

To make it work , mount the roaming app data GPO by updating registry

image

And now make change to the file rcplauncher.properties by updating the field called rcp.data as shown below .

image

With this you would be able to launch IBM same time on streamed pooled VM.

How to Publish Google Chrome 13.0 with XenApp 6

To publish Google Chrome , we need to download standalone msi package from google

12/29/2008-13:42:29 http://dl.google.com/update2/1.2.131.27/GoogleUpdateSetup.exe
12/29/2008-13:42:29 http://dl.google.com/update2/1.2.131.27/clickonce_bootstrap.exe
12/29/2008-13:42:35 http://cache.pack.google.com/chrome/install/154.36/chrome_installer.exe

Or from following url https://www.google.com/chrome/eula.html?standalone=1

Install the standalone package and this will get installed under the user profile whoever is logged in. In this example Administrator is logged in hence the shown path . We need to copy Chrome.exe under 13.0.782.112 folder as shown below. Administrator folder should be given Modify permission for all the users.image

Now create googleChorme.cmd file under program folder with shown entry.image

Publish this CMD as usual using Citrix Delivery Console. image

You can launch and safely ignore the message   and use google chorm

image

Thursday, December 1, 2011

How to install Desktop Director and configure for MultiSite in XenDesktop 5.0

When you have multiple site running XD 5.0 Farm and Help Desk want to use single desktop director to manage both farm . We need to update desktop director with other farm controller name

To install standalone desktop director you can run DDC 5.0 ISO and choose following . Update DDC FQDN in the given format and hit test

image

This will finish Desktop Director  installation

image

Once installation done we need to open IIS management . Drill down to DesktopDirector and highlight Application setting.

image

This will bring all the setting related to Desktop Director . There are two setting which we need to modify in order to manage multiple site.

image

We need to change from 'false' to 'true'

image

Update here with all the controller FQDN to manage all the site.

image

Restart the IIS here and then browse to the page . This webpage will be different and here you wont get dashboard. Only thing can be done here is search users and then address the issue pertaining to the user. So it would be very important to decide if you like to make these changes and use it . This is with Desktop Director 1.0 . There are few changes which has been made to Desktop Director 2.0 which will allow you to manage XD 5.5 and XA 6.5 farm as well . Source is here

image

Tuesday, November 29, 2011

How to remove XenDesktop DDC5 gracefully from the XD5 farm

In my previous blog I mention hard way to remove stale DDC from XD database.

Launch the Desktop Studio and highlight controllers as shown below. Select the controller you want to remove and choose "Remove Controller"

image

This will prompt for action to update Database . Choose "NO " here image

This will prompt for generating SQL script which needs to be run on SQL server database

image

Script looks like this . Copy this script

image

And then choose DDC database on SQL manager . Right click and select new script . Paste  it from previous step and run "Execute"

image

Once the script is ran then it will give following message

image

Once Desktop Studio is update , controller will be removed

image

Run powershell command Get-BrokerController and confirm that other controller is out completely.

image

Friday, November 18, 2011

How to remove stale DDC from XenDesktop 5 Farm

Stale DDC inside XenDesk 5 Farm may get created because of various reason and this does not get removed unless database is cleaned.

1. If you run Get-brokercontroller from PS console of Desktop Studio then you see the stale entry. Below two stale entry for SID

S-1-5-21-1757981266-413027322-725345543-64627 and  other one ending with 64712image 

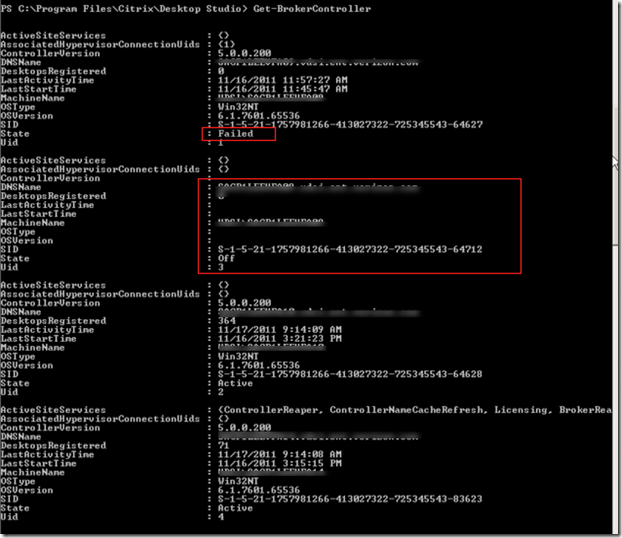
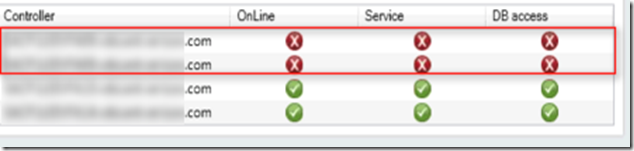
2. Same thing will be shown via Desktop Studio

 image

3. Following script needs to be run in same order from desktop studio PS console with XD database name

Get-ConfigDBSchema -DatabaseName <XD database name> -ScriptType Evict -SID $sid > EvictDDC.sql  (Here we are creating EvictDDC.sql)
Get-AcctDBSchema -DatabaseName <XD database name> -ScriptType Evict -SID $sid >> EvictDDC.sql(Here we are appending to  EvictDDC.sql)
Get-HypDBSchema -DatabaseName <XD database name> -ScriptType Evict -SID $sid >> EvictDDC.sql
Get-ProvDBSchema -DatabaseName <XD database name> -ScriptType Evict -SID $sid >> EvictDDC.sql
Get-PvsVmDBSchema -DatabaseName <XD database name> -ScriptType Evict -SID $sid >> EvictDDC.sql
Get-BrokerDBSchema -DatabaseName <XD database name> -ScriptType Evict -SID $sid >> EvictDDC.sql

4. This is how Script needs to be run in following order . First SID variable needs to be set and then rest of the commands need to be run. Here we are creating EvictDDC.sql file which is nothing but a stored procedure

image

5.  This file can be found under following

image

6. Now when we open this file with notepad  following entry can be found.

image 

7.   Open SQL server management studio and select the database and then open new script. Select the content from EvictDDC.sql  and paste as shown. Execute as shown below

image

8.   Last command Get-BrokerDBSchema -DatabaseName <XD database name> -ScriptType Evict -SID $sid >> EvictDDC.sql  need to run as follows.

image

9.  Sometime Get-BrokerDBSchema -DatabaseName <XD database name> -ScriptType Evict -SID $sid >> EvictDDC.sql will fail with following message. Create new store procedure using working XD SID and then replace host name and SID with non working SID.

image

10.  Once all the above store procedure ran it will remove the stale entry from DDC

image

Even Desktop Studio will update the entry

 image